These gluten free triple layer dessert bars are the kind of no-bake treat you keep stocked in your freezer at all times—rich chocolate ganache, a smooth peanut butter layer, and a cookie crumble base that holds everything together perfectly. If you’ve ever wanted a dessert that feels indulgent but is made with simple, real ingredients…this is it.
They come together quickly, slice best straight from the freezer, and have that perfect balance of crunchy, creamy, and chocolatey in every bite. These are the kind of bars you pull out for guests—or keep hidden for yourself.
This post may contain affiliate links, please read our disclosure policy for details.

Why you’ll love these Triple Layer Dessert Bars:
- No-bake and simple to make (minimal effort, big payoff)
- Best served frozen → firm, sliceable, and not messy
- Perfect chocolate + peanut butter combo
- Gluten free with clean ingredients
- Great for prepping ahead and storing in the freezer
- Tastes like a homemade candy bar, but better
Common Mistakes to Avoid
- Not pressing the crust firmly enough
- Skipping chill time between layers
- Using dry or separated peanut butter
- Cutting before fully set
- Leaving out too long before serving
Variations
- Dairy-Free: Use dairy-free chocolate for ganache
- Nut-Free: Swap peanut butter for sunflower seed butter
- Extra Crunch: Add chopped nuts or crushed pretzels to the base
- Chocolate Lovers: Add chocolate chips into the peanut butter layer
- Salted Version: Sprinkle flaky salt on top of the ganache
Ingredients
Please see recipe card at the bottom of this post for the full recipe details.
1. Cookie Crumble
These cookie crumbles really elevate the base layer of this chocolate crust and it is 100% refined sugar free.
2. Butter
Butter adds richness to the cream filling. Using a high-fat butter like Kerrygold works especially well here. If you need a dairy-free option, you can substitute a dairy-free butter alternative without issue.
3. Vanilla Extract
Vanilla extract rounds out the chocolate flavor and adds warmth. Use a pure vanilla extract for the best results.
4. Peanut Butter
Peanut butter is a rich, creamy spread made from ground peanuts, known for its nutty flavor and naturally smooth texture. It adds depth, protein, and a slightly sweet, savory balance to both sweet and savory recipes.
5. Maple Syrup
Maple syrup helps balance the sweetness from the powdered sugar by provides natural sweetness while adding moisture and depth to the filling.
6. Coconut Oil
Coconut Oil is a versatile, naturally rich cooking fat known for its smooth texture and gentle coconut aroma. With a high smoke point and stable structure, it works beautifully for sautéing, baking, roasting, and (in this case) as a smoothing agent for the chocolate to help create a nice glaze.
7. Chocolate Bar
Chocolate chips are used to create the signature layer of chocolate outside of the peppermint patty itself. You can get creative and use dark, milk or white chocolate to switch things up within this recipe.
8. Raw Cream
Raw cream is simply the naturally separated cream that comes from raw milk. If you do not choose to or have access to drinking/using raw cream, it can easily be substituted out for heavy whipping cream or coconut cream (for a dairy free alternative). The cream is used to drizzle over the proofed rolls and help them to maintain moisture while they bake.
9. Salt
A small amount of salt balances the sweetness and enhances the chocolate flavor. Don’t skip it—it makes a noticeable difference.
Additional Allergens/Suggested Modifications
- Dairy: sub dairy free alternatives
- Nut: sub for nut free peanut butter
This recipe is naturally free of: egg, nuts, fish, crustacean shellfish, peanuts, wheat, soybeans, seed oils and sesame.

The Gluten Free Kitchen Cookbook Series
Healthy GLUTEN-FREE Recipes for Every Day LIFE
Your go-to cookbooks for all of the delicious & nutritious meals, sides, breads (yeast & sourdough), baking staples, snacks, desserts, drinks and more. With easy-to-follow instructions and beautiful step-by-step photography, every page invites you to explore nostalgic, healthy meals that make being gluten free a “get to” instead of a “have to”.
Whether you’re cooking for yourself or sharing with loved ones, The Gluten Free Kitchen Cookbook Series brings healthy living to your table every day.
Making the Triple Layer Dessert Cake
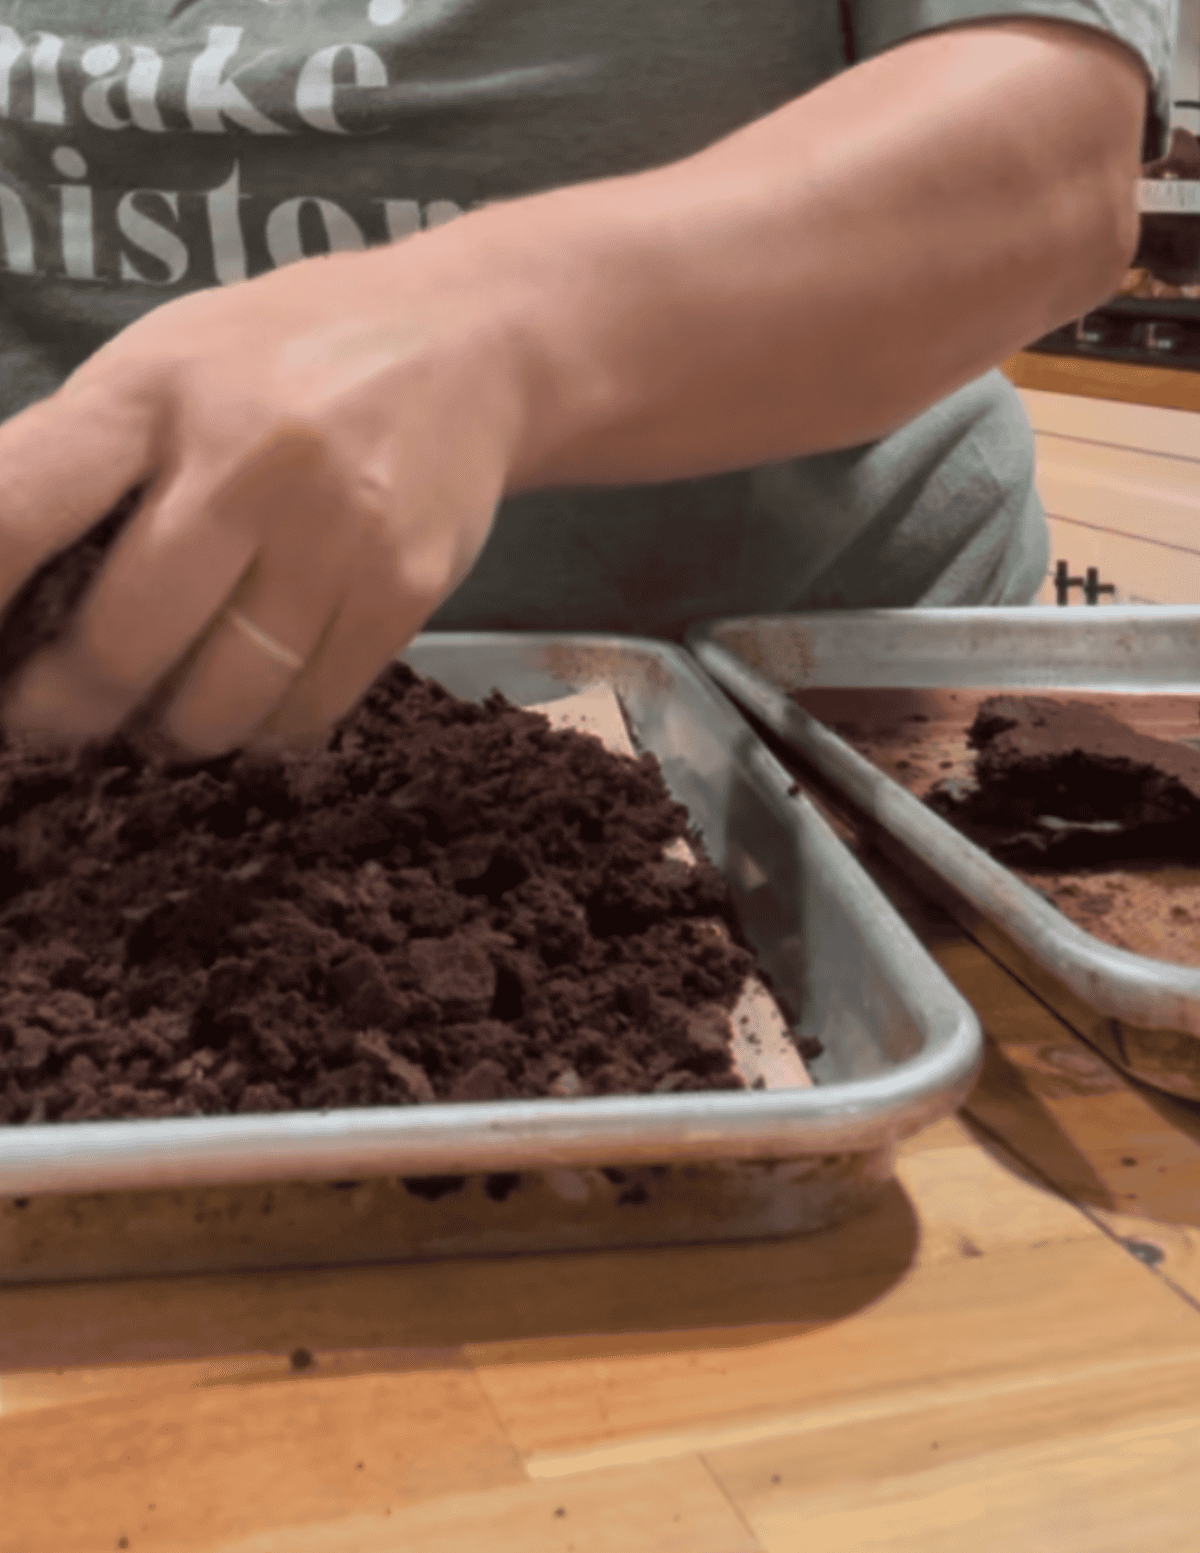
1. Prepare the chocolate cookie crumble.
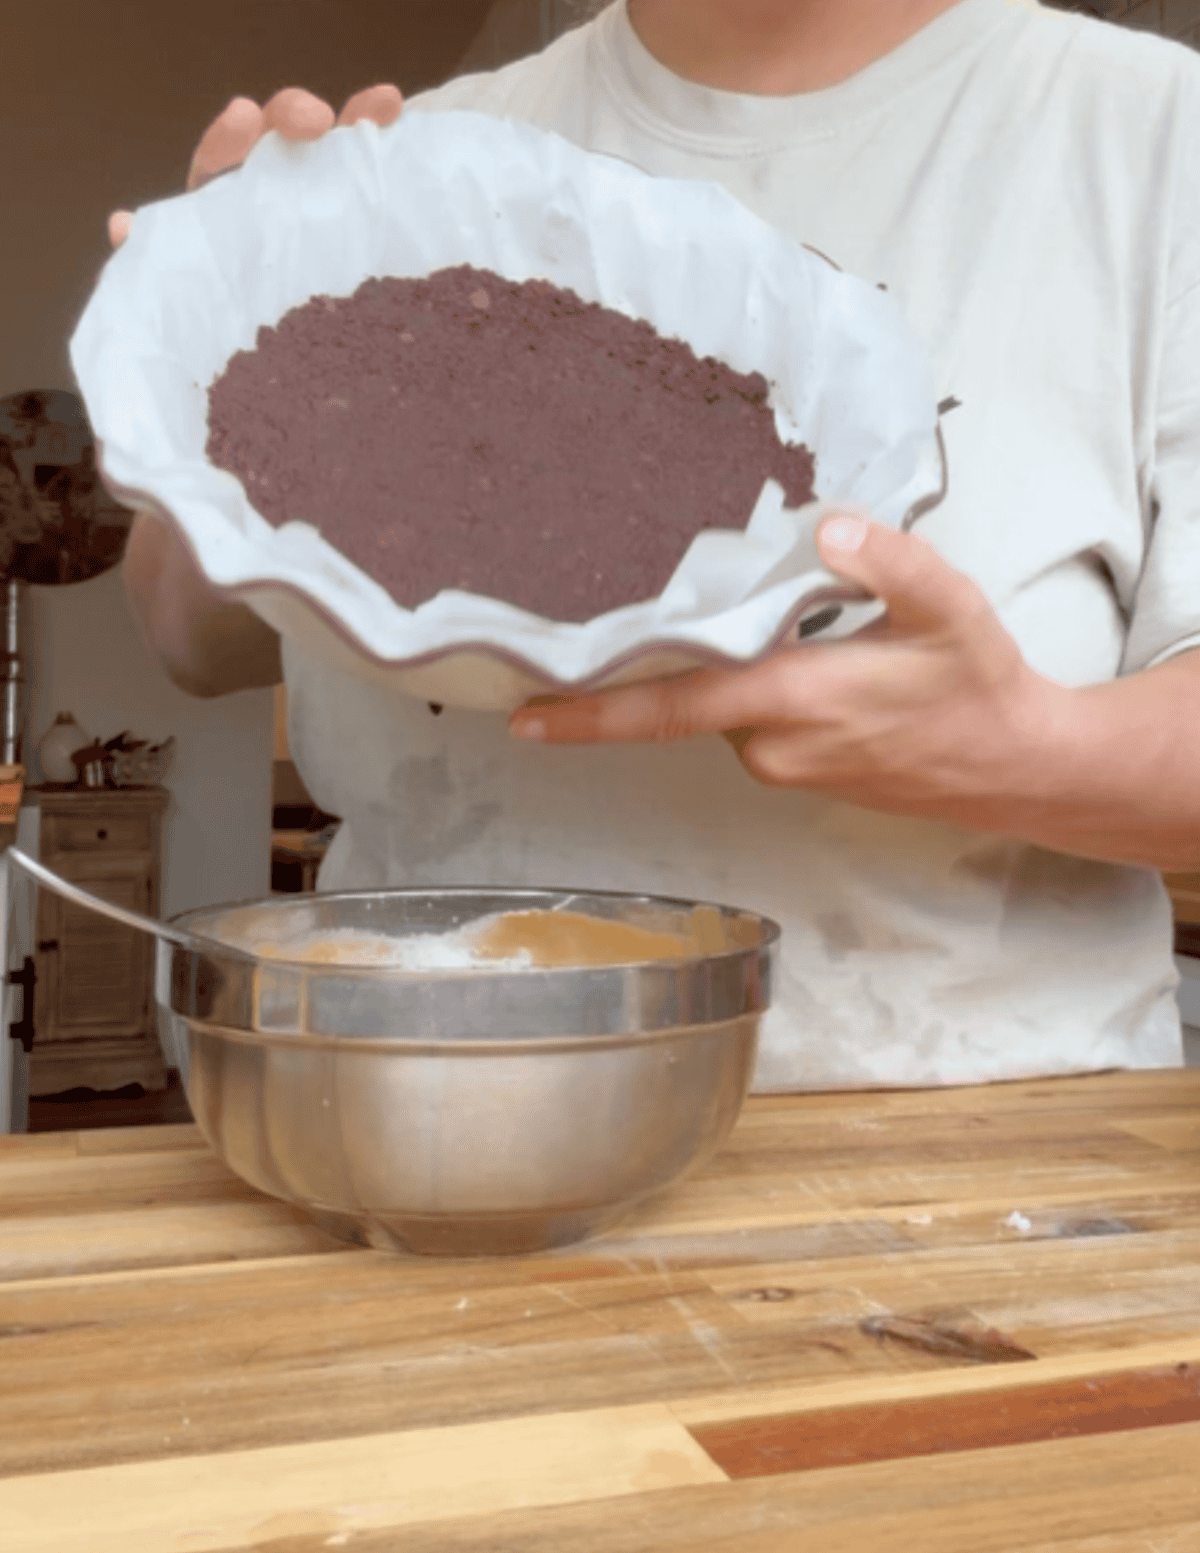
2. Mix the crumble together with other base ingredients and press it into a parchment paper lined dish.
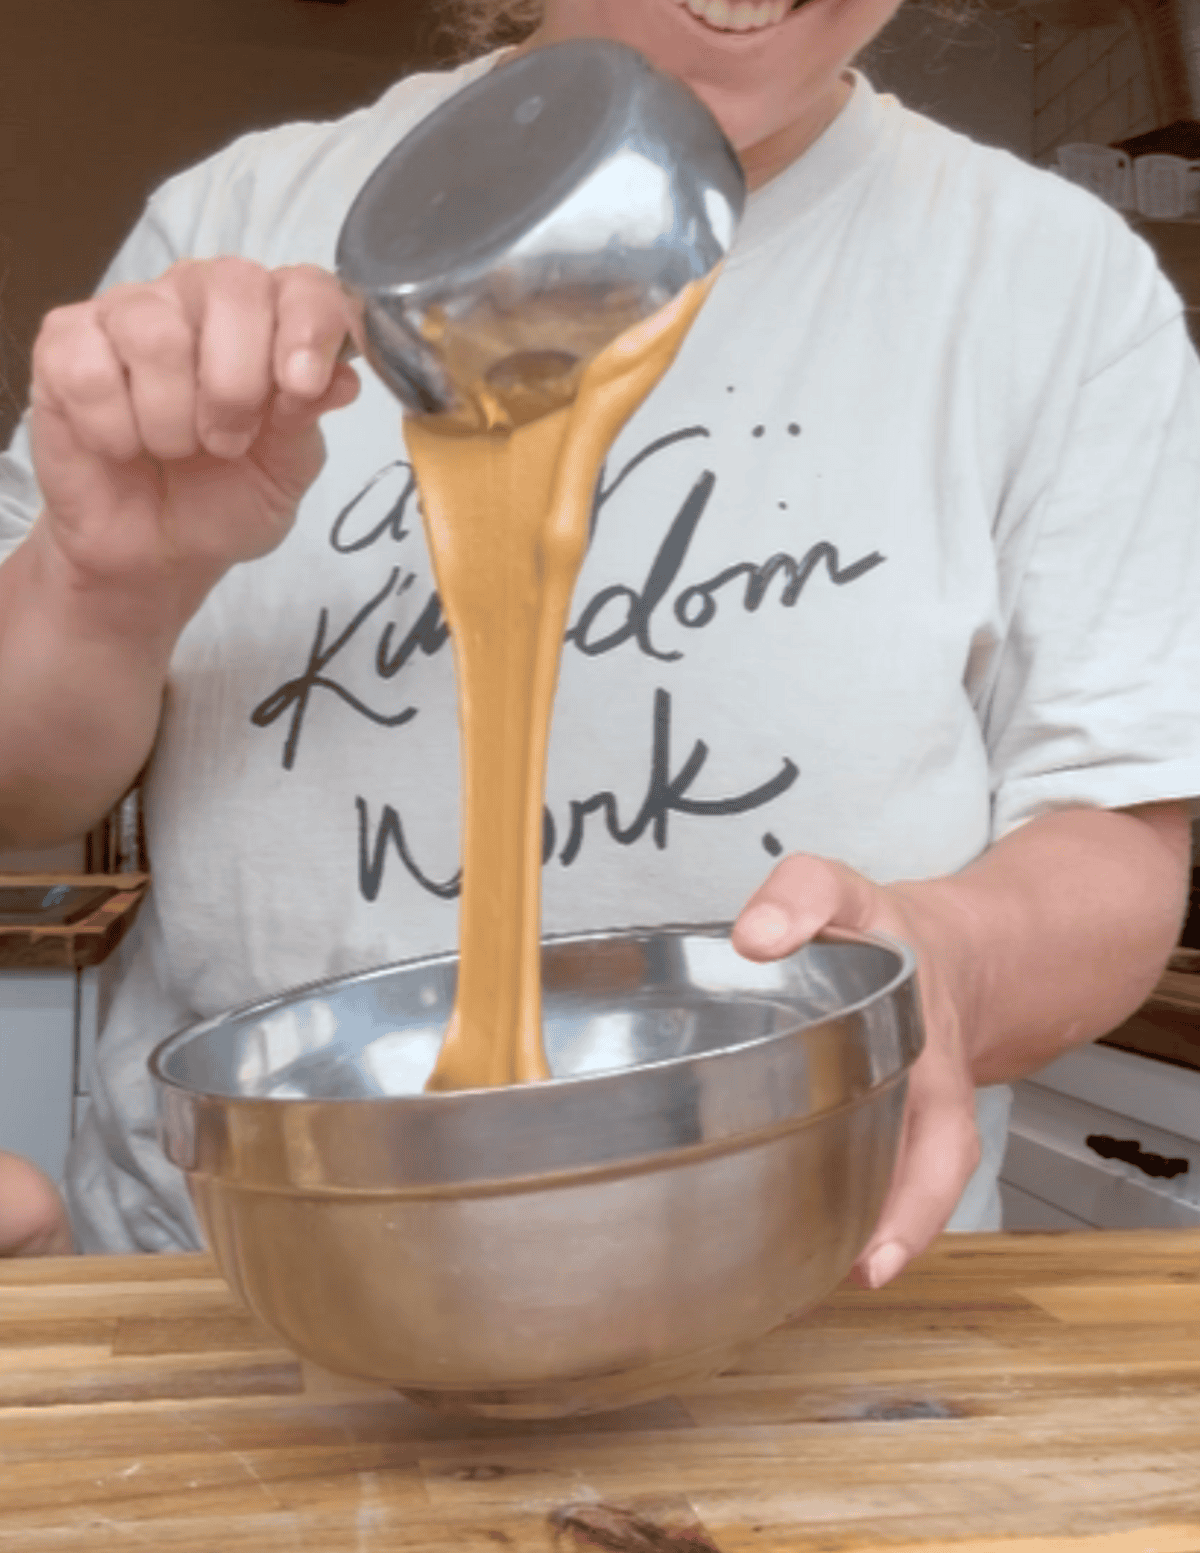
3. Mix up the peanut butter filling.
4. Melt the coconut oil and whisk it until it’s well incorporated.
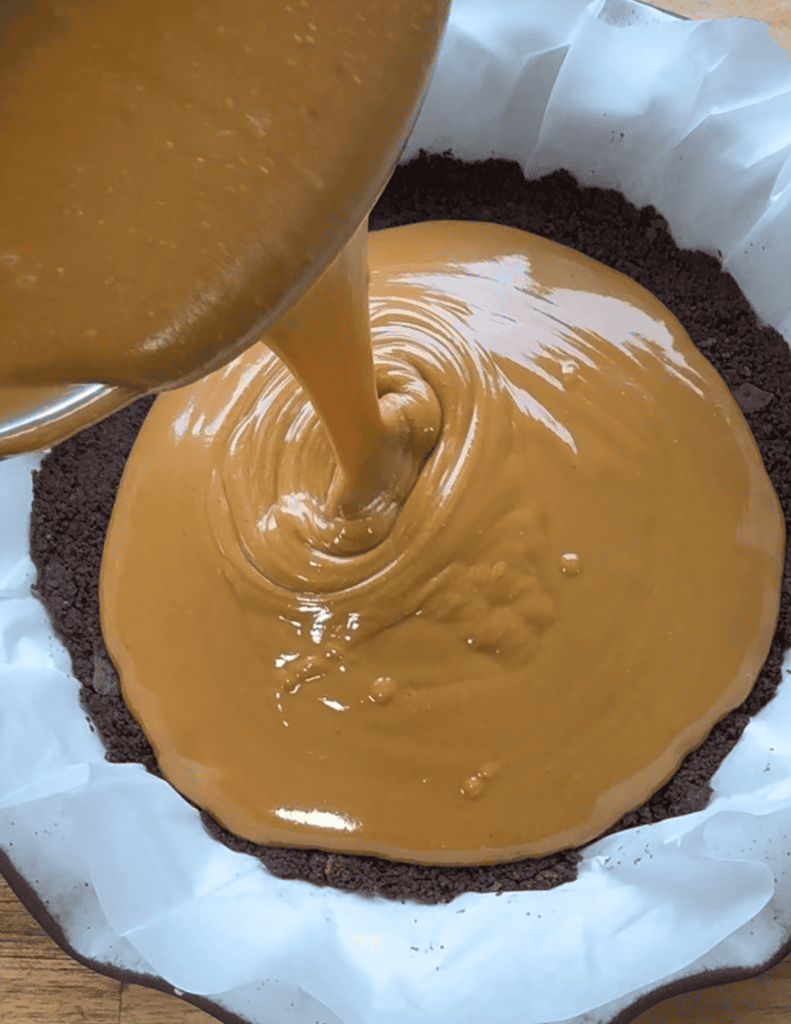
5. Pour the filling in the base and prep the chocolate/cream topping.
6. Freeze the dessert.
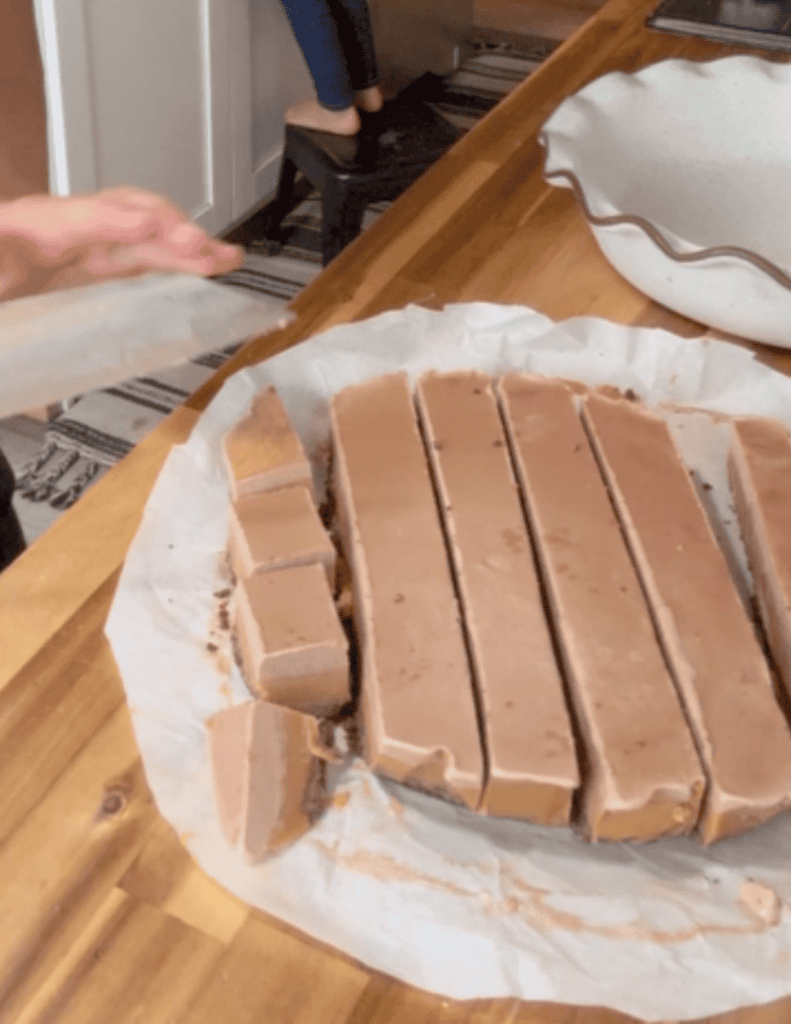
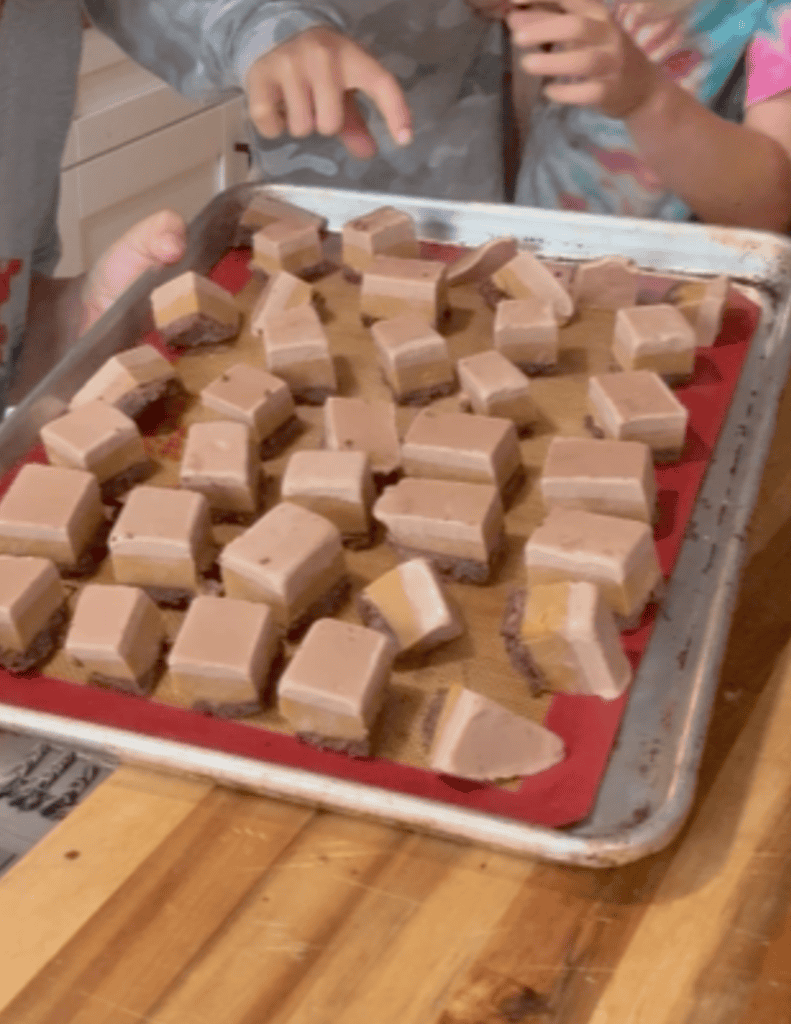
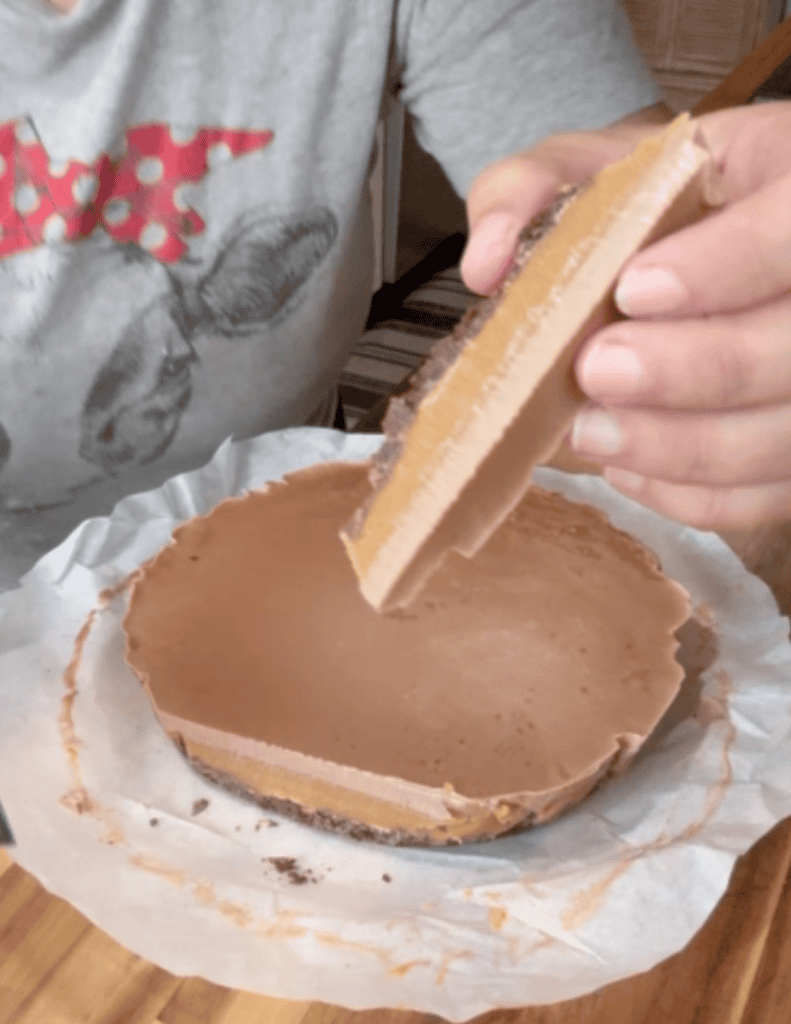
7. Slice the frozen dish into sections.
8. Enjoy the pieces, and store in the freezer.

Triple Layer Dessert Bars (Chocolate + Peanut Butter)
Ingredients
Cookie Base:
- 1 1/2 cup Cookie Crumble
- 4 tbsp Butter
- 2 tsp Vanilla Extract
Filling:
- 1 cup Peanut Butter creamy
- 1/2 cup Maple Syrup
- 1/4 cup Coconut Oil melted
Topping:
- 3 oz Chocolate Bar chopped
- 1 cup Raw Cream can be subbed for heavy whipping cream
- 1 Salt sprinkle on top
Instructions
- Combine cookie base ingredients together and form them into the bottom of a 8×8 dish lined with parchment paper.
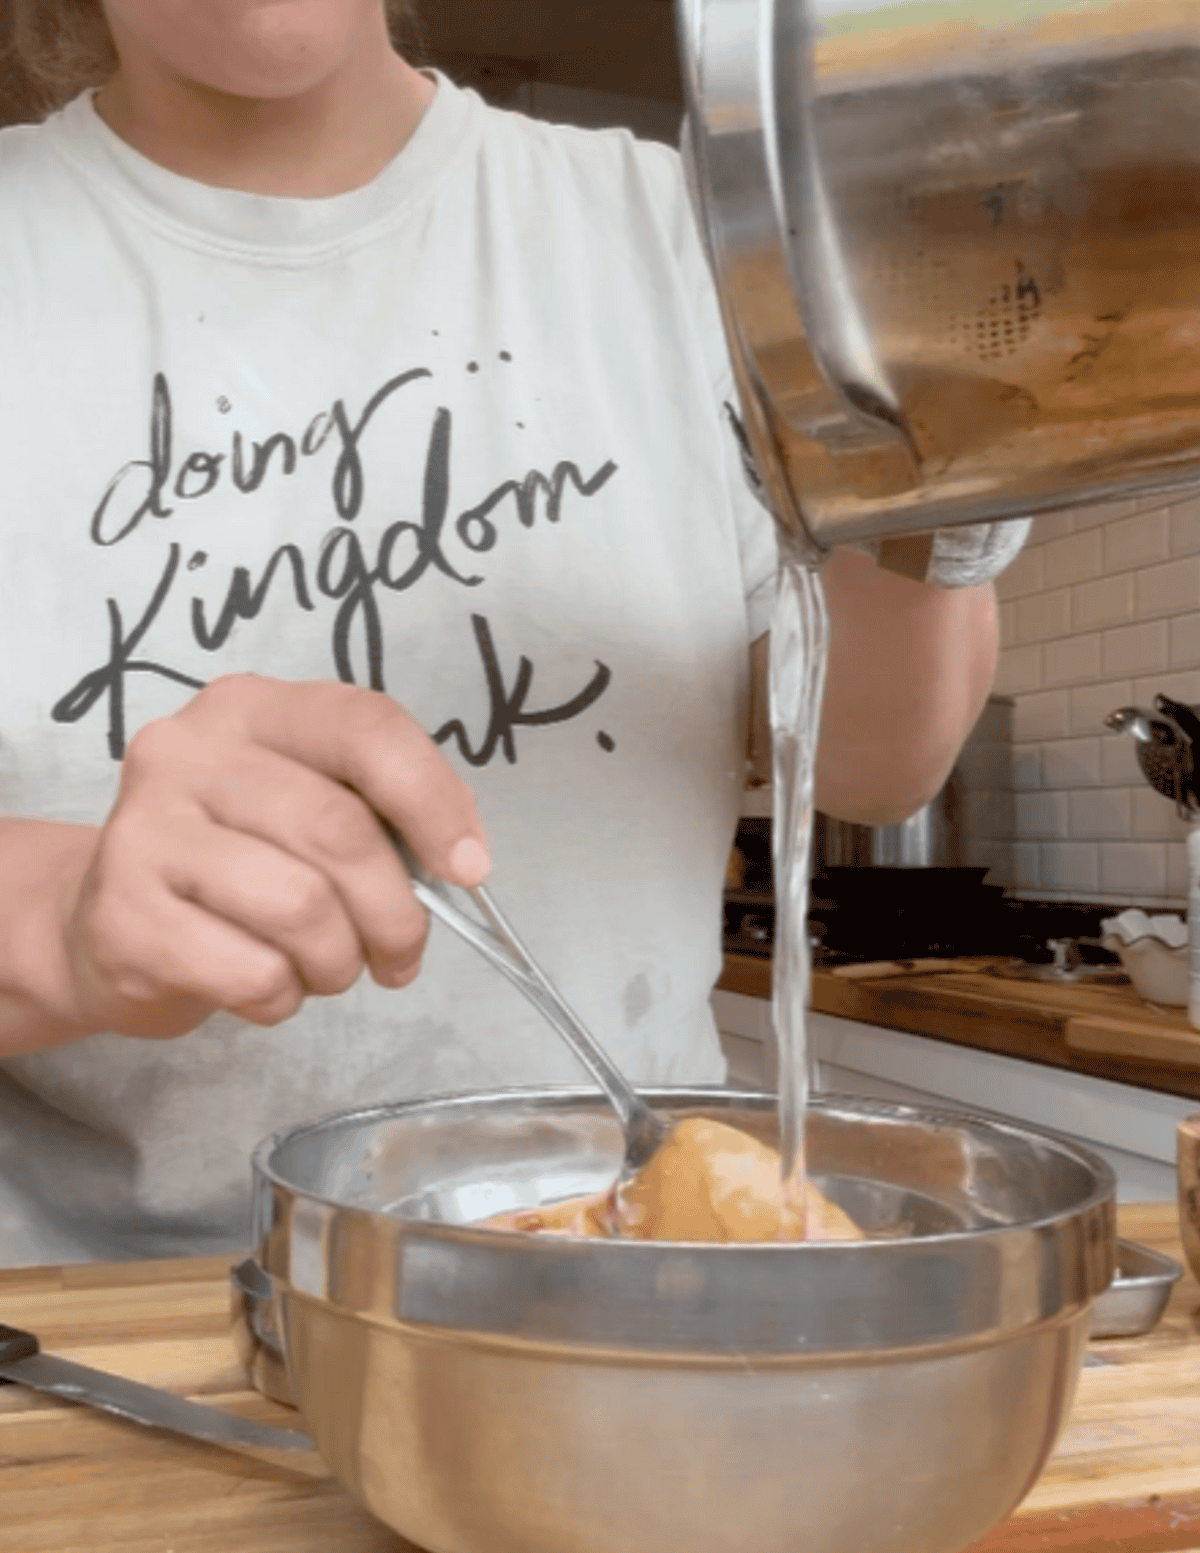
- Once bottom layer is pressed down well and no longer crumbly, mix up the filling ingredients. Once combined, pour over top of the base layer and place in the fridge for 30 minutes.
- While the first two layers are firming up, make the chocolate topping. Choose a chocolate bar of choice (I use a dark chocolate that is locally sourced but any dark chocolate bar should work). Chop up the bar into small pieces.
- In a sauce pan, melt the chocolate in with the raw cream until well combined and let cool.
- Once cooled (but still soft and pourable), pour the chocolate mixture over the first two layers and allow it to firm up in the fridge for 2 hours.
- Cut and serve. I prefer it frozen but it can be enjoyed at room temperature (it will be a little messier – but still delicious!)
Recipe Tips
Press the cookie crumble base firmly so it holds together when slicing
Use smooth, well-mixed peanut butter for the creamiest middle layer
Let each layer set before adding the next to keep layers clean and defined
For best results, freeze before slicing—this keeps everything intact
Use a hot knife (run under warm water) for clean cuts
Serving tip: Best eaten straight from the freezer or after 5 minutes at room temp
Storage Options:
- Refrigerator: I don’t suggest storing at room temperature although you can! The cuts of dessert bar will soften and get messy when you eat them (still delicious, just softer).
- Freezer (best option): Store for up to 2 months in an airtight container.
- Freezer: Freeze the filling or the completed patty for up to 6 months in an airtight container.
Recipe FAQs
If you love nostalgic candy recipes made with simple ingredients, check out more copycat treats inside Volume 2 (desserts & treats) of The Gluten Free Kitchen Cookbook Series.
Get on the List
Subscribe to Receive the Gluten Free Pantry Must Haves Ebook
Did you make this recipe?
We’d love to see! Tag @farmfreshfamily on Instagram!